Pallet Tracking – How to set up Pallet
Prompts
The Coreflex Pallet Tracking Module allows you to:
1) Customize the prompt names of the data collected for pallets.
2) Select fields to automatically generate a sequential number (Receiving Lot, etc)
If you customize any prompts, use the Pallet Prompts Worksheet to record prompt names.
Below is the Pallet Tracking Pre-Receive screen.
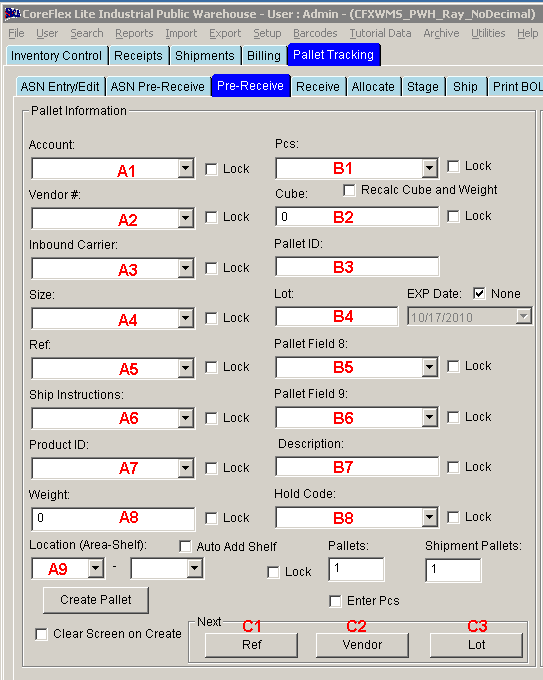
Changes made to the prompts will appear on the Pre-Receive screen and other screens. For example if you change Inbound Carrier (A3) to Container, Container will display on all screens that previously displayed Inbound Carrier.
Prompts that can be renamed are indicated below with the corresponding system setting. All prompt names MUST BE UNIQUE. For example if you are not using 2 of the prompts they can not both be named "NA". You could name them "NA1" and NA2". Change the system setting to rename the prompt.
|
Pre-Receive Column |
Default Prompt Name |
System Setting |
|
A1 |
Account |
None |
|
A2 |
Vendor # |
Pallet
Tracking: Vendor Name |
|
A3 |
Inbound
Carrier |
Pallet
Tracking: Inbound Carrier Name |
|
A4 |
Size |
Pallet
Tracking: Size Name |
|
A5 |
Ref |
Pallet
Tracking: Inbound Reference Name |
|
A6 |
Ship
Instructions |
Pallet
Tracking: Shipping instruction Name |
|
A7 |
Product ID |
None |
|
A8 |
Weight |
Pallet
Tracking: Pallet Weight Name |
|
A9 |
Location |
None |
|
B1 |
PCS |
Pallet
Tracking: Pieces Name |
|
B2 |
Cube |
None |
|
B3 |
Pallet ID |
Pallet
Tracking: Customer Pallet Id Name |
|
B4 |
|
Pallet
Tracking: Pallet |
|
B4-a |
Exp Date |
|
|
B5 |
Pallet
Field 8 |
Pallet
Tracking: Pallet Field 8 |
|
B6 |
Pallet
Field 9 |
Pallet
Tracking: Pallet Field 9 Pallet
Tracking: Physical PalletID Field |
|
B7 |
Description |
None |
|
B8 |
Hold Code |
Pallet
Tracking: Pallet Field 10 |
|
C1 |
Next Ref |
Pallet
Tracking: Pallet Entry Next Button 1 Field |
|
C2 |
Next
Vendor |
Pallet
Tracking: Pallet Entry Next Button 2 Field |
|
C3 |
Next |
Pallet
Tracking: Pallet Entry Next Button 3 Field |
|
n/a |
Status |
None |
|
n/a |
Count
Status |
None |
|
n/a |
Pallet
Field 6 |
Pallet
Tracking: Pallet Field 6 |
|
n/a |
Pallet
Field 7 |
Pallet
Tracking: Pallet Field 7 |
To rename a prompt:
1) Go to Menu Setup – System
2) Scroll to the appropriate system setting for the prompt. (See table above)
3) Click on the setting to select it.
4) Enter the new value in the New Value field.
5) Click Change.
Note:
You will need to stop and Start Coreflex before the changes will appear. You can change multiple entries and then stop and start once.
These settings are local profiles settings. Changes must be applied to each Install of Coreflex. If a server or network license is being used, the change will only have to be applied to the server.
Any unused prompts may be renamed to Not Used or something similar. However you may not duplicate a prompt name. You must use Not Used 1, Not Used 2, or something similar.

Next Buttons:
The Next buttons (C1 thru C3) automatically generate a sequential number with a prefix. (For example FTZ1000, FTZ1001, etc....) These have additional system settings to assign the number to a specific data entry field on the screen. See the DB Field column in the Database Field Name Table below.
To assign a Next
button to a specific field:
1) Go to Menu Setup – System
2) Scroll to the appropriate system setting for the prompt. (See table above)
3) Click on the setting to select it.
4) Enter the new value in the New Value field.
a. If you are changing the field for which the next button will be used, choose the corresponding database field from the New Value drop down list.
5) Click Change.
Note:
You will need to stop and Start Coreflex before the changes will appear. You can change multiple entries and then stop and start once.
These settings are local profiles settings. Changes must be applied to each Install of Coreflex. If a server or network license is being used, the change will only have to be applied to the server.
Database Field Name
Table:
Note: Importing Pallets - When Importing Pallet Information, the DB Field name below must be used in the pallet import file header record, not he Prompt Name. Do not include the table name. For example to import A5 (Ref), enter USER_DEFINED4 in the import file header record.
|
Pre-Receive Column |
Default Prompt Name |
DB Field |
Comment |
|
A1 |
Account |
cartonheader.customerno |
Next # |
|
A2 |
Vendor # |
cartonheader.vendorno |
Next # |
|
A3 |
Inbound
Carrier |
cartonheader.user_defined2 |
Next #
This field will show throughout the system (history, billing, es, etc.)
Can also be roled up (summarized) into a single line on a storage bill for minimum billing) |
|
A4 |
Size |
cartonheader.user_defined3 |
|
|
A5 |
Ref |
cartonheader.user_defined4 |
Next #
Can also be roled up (summarized) into a single line on a storage bill for minimum billing)
use as
date code if using suggested pick sheet for pallets (mm-dd-yy) |
|
A6 |
Ship
Instructions |
cartonheader.ship_inst |
Next # |
|
A7 |
Product
ID |
cartonitems.productid |
|
|
A8 |
Weight |
cartonheader.weight_actual |
|
|
A9 |
Location |
cartonitems.area
(.shelf) |
|
|
B1 |
PCS |
cartonheader.user_defined5 |
|
|
B2 |
Cube |
cartonitems.cube |
|
|
B3 |
Pallet ID |
cartonheader.user_defined1 |
Next # |
|
B4 |
|
cartonitems.lotno |
Next # |
|
B4-a |
Exp Date |
|
|
|
B5 |
Pallet
Field 8 |
cartonheader.user_defined8 |
Next # |
|
B6 |
Pallet
Field 9 |
cartonheader.user_defined9 |
Next # |
|
B7 |
Description |
cartonitems.description |
|
|
B8 |
Hold Code |
cartonheader.user_defined10 |
Any value
in this field will put the pallet in a hold status when received based on a
system setting. |
|
C1 |
Next Ref |
|
Automatically
generates a sequence number. |
|
C2 |
Next
Vendor |
|
Automatically
generates a sequence number. |
|
C3 |
Next |
|
Automatically
generates a sequence number. |
|
n/a |
Status |
cartonheadeer.status |
|
|
n/a |
Count
Status |
TDB
(research) |
|
|
n/a |
Pallet
Field 6 |
cartonheader.user_defined6 |
Next # |
|
n/a |
Pallet
Field 7 |
cartonheader.user_defined7 |
Next # |