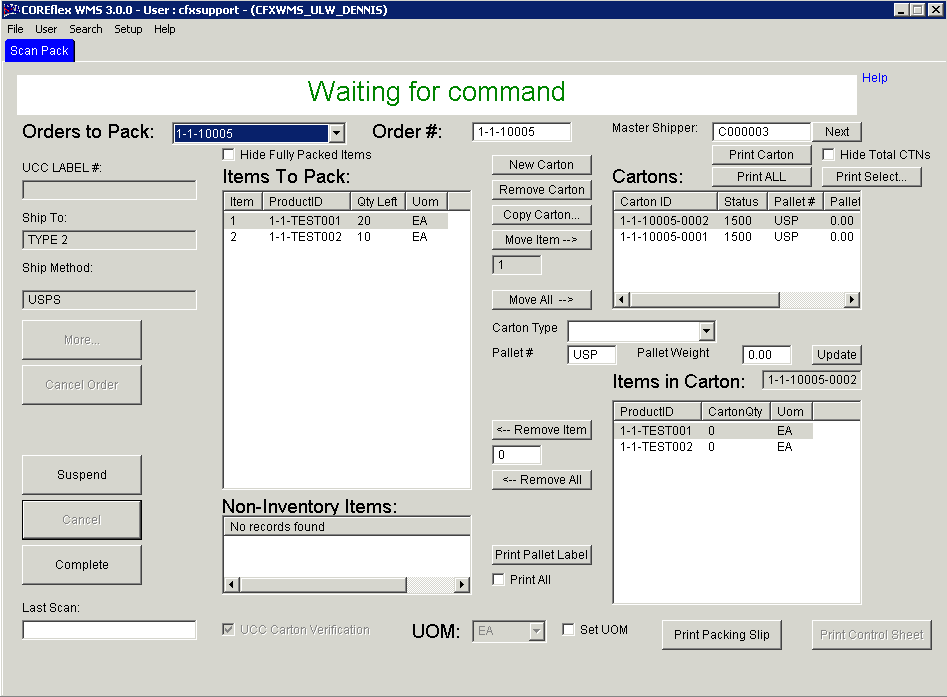
This screen is used to verify picked orders and pack the material into Cartons. Labels can then be printed for the Cartons. The screen can be used with or without a Barcode Wedge scanner to scan the products.
If this box is checked , the 'Items to Pack' list would not show items that were already moved into the Carton.
This is helpful in case you have so many items on the list and you want to have a clear view of what's left to scan and hide the ones that have already been scanned..
Last Scan
This field receives the Scans from the Wedge scanner. When using the Wedge scanner, insure this field is in Focus by Clicking on it before scanning.
This field displays the Unit Of Measure being used for the Highlighted Product in the Items to Pack list.
This field can also be used to select which UOM to use. To enable this field, check Set UOM.
If Set UOM is not checked, then base units are assumed unless the Wedge scanner is being used and the Scan Code UOM for the product is something other than base units.
This allows the selection of what Unit of Measure is being scanned for the Product highlighted in the Items To Pack List. All units of measure in the Product's UOM Class will be displayed in the drop down. If a product is kept, for example, in Eaches and Cartons of 12, the drop down would show EA and CTN. If then CTN is selected, moving a quantity of 1 will actually move 12 eaches into the Carton being packed.
List Columns
Items to Pack List Column
This would show the list of items that are already packed and also those that can be packed into the Carton.
*Note* If you have the box that says Hide Fully Packed Items checked, the Items to Pack list would only show items that have not been packed into the Carton yet, and it woul hide items that have been packed already.
Item
Product ID
Qty Left
UOM
Carton Line List Column
This would show the Carton(s) where the items would be packed.
This would show the list of Items that have been packed in the Carton.
Product ID
Carton Qty
UOM
Buttons
Cancel
Removes all Cartons and sets the Qty Left back to the original values as if the order was never Scan Packed.
The Sales Order can then be Scan Packed again from the begining.
Cancel Order
If
an order was imported as a sales order form quickbooks or imported with an ORIGIN column of QBSO_RFS, the Cancel Order button
will be enabled.
This will first perform the operation of the Cancel Button below, then Cancel the Sales Order.
Complete
This is clicked when all items have been Scan Packed. If any items are not packed, an error message will be displayed.
The status of the order will go to Packing Complete.
If the System Setting: Scan Pack: Export Cartons when Order is Complete is set to Yes, the Carton Records will be made available to be exported using the Export Cartons screen.
Copy Carton
Copies the highlighted Carton and its contents into a new Carton. There must be sufficient items to pack for all items in the Source Carton or an error message will be displayed.
A
dialog will appear asking for the number of cartons to create. Enter
the number of copies of the original carton you would like to make and
click OK or click Cancel to exit without copying.
After
clicking OK, the cartons will be generated and added to the Cartons List
and they will have identical contents and attributes to the original
carton copied. The quantities for
the products on the order will also be decremented and marked as scanned.
The Text after Copy for this button can be changed using the System Setting: Scan Pack: Carton Prompt.
Moves the highlighted Item to Pack into the highlighted Carton. The quantity to move is set in the field below the button.
The button can be changed only if the System Setting: ScanPack: Scan All Mode is set to No.
This button is greyed out and disabled, unless the user has a Function of SCANPACK_MOVES set to Level 100 under the Set-up - Users Screen.
Move All
Moves Item to Pack all items that have a Qty Left greater than 0 into the highlighted Carton. The Qty Left for all Items to pack will be 0.
This button is greyed out and disabled, unless the user has a Function of SCANPACK_MOVES set to Level 100 under the Set-up - Users Screen.
Next (Master Shipper)
This will put the Next Master Shipper number in the Master Shipper field. When the Order is completed, the Master Shipper number will be set in all the inner cartons for the order.
New Carton
Creates a New Carton in the Cartons list to be used for Packing. The Carton's Pallet # and Pallet Weight will default to the Pallet # and Weight field values.
The Text after New for this button can be changed using the System Setting: Scan Pack: Carton Prompt.
Print Carton
Prints the Carton Content information. This is done based on the System Setting: Printers: Carton Contents Label. There are 4 label types to Choose From.
The Text for this Button will change to Print Mst Shipper if the above system setting is set to Multi Order. Otherwise, it will read Print Carton.
Print Control Sheet
Print the Control Sheet for use with the Scan Pack screen. The Sheet Contaons Barcodes for many of the Functions required to Scan pack an order, allowing the operator to Scan Pack the order with minimal use of the mouse on the PC.
This button is enabled for Users with a Function of Setup Level 1 or better assigned to them.
An Order must be open on the screen in order to print the Control Sheet.
Prints a Label for the Pallet Currently Displayed in the Pallet # field.
Check Print All to print all Pallet Labels for the Order
The Pallet Label format is determined by the System Setting: Scan Pack: Pallet Label Format. There are currently 2 Formats to choose from.
Remove Carton
Removes the Carton highlighted in the Cartons List. The Qty of the products in the Cartons will go back to the Items to Pack List.
The Text after Remove for this button can be changed using the System Setting: Scan Pack: Carton Prompt.
Remove All
Removes all items from the highlighted Carton. The Carton will be empty and the Qty Left will be incremented based on the quantity of items that were in the Carton.
Remove Item
Removes the highlighted Item in Carton. The quantity to remove is set in the field below the button.
The Qty left for the Item to Pack will be incremented.
Suspend
Clears the screen allowing another order to be Scan Packed. The orginal order's Scan Pacl information is saved until the Order is brought up on the Scan Pack screen when the Scan Packing can be continued.
Update
Updates the highlighted Carton's Weight and Pallet # with the values in the Weight and Pallet # fields.
Additional System Settings
Orders: Order Import Post Script
Set this to SETUP_FOR_SCANPACK_POSTIMPORTORDER.SQL and Sales Orders imported using the Standard Order Import will be immediatelyt available to be Scan-Packed. This would skip the Allocation and Confirmation steps and is used if inventory is not to be kept in Coreflex
Orders: Order Import Error if product does not exist
If you want to scan pack orders for products that Do Not exist in your Product master, set this to No. It is used to determine whether orders with unknown products can be applied.
Quickbooks: Invoice-SO-Pending SO Import Direct to Scan Pack
If this is set to Yes, then Invoices, Salesorders, Pending Sales Orders imported from QuickBooks will be immediately available to be Scan-Packed. This would skip the Allocation and Confirmation steps and is used if inventory is not to be kept in Coreflex.
Scan Pack: Allow Match on Order Productid if scan not found
Set to Yes to be able to scan Order Item ProductIDs as well as Product Master Scan Codes.
Set to No to match solely on Product Master Scan Codes. All Products must have scan codes with this setting.
Scan Pack: Carton Prompt
This defaults to Carton and allows the word Carton to be changed in all places on the screen.